You’re standing in your kitchen, surrounded by the ghosts of renovations past: the honey oak cabinets that seemed so rich in 1998, the brass light fixtures casting a dated glow, the laminate countertops that have seen one too many spills. You know it needs a change, but the thought of a full gut renovation is overwhelming, both in time and budget. The question isn’t *if* you should update, but what to update first in a dated kitchen to get the biggest visual payoff without starting from scratch. The secret isn’t in picking the most expensive item, but in following a specific sequence—a protocol—that builds modern impact layer by layer, starting with the elements that frame everything else.
To achieve the biggest visual impact in a dated kitchen, start by updating your lighting fixtures, then replace cabinet hardware, and finally upgrade the sink and faucet. This layered approach modernizes the space’s ‘jewelry’ before considering larger, more expensive changes. Tackling these three elements in order creates immediate definition and a contemporary feel, proving you don’t need to replace everything to transform the room’s look.
The Protocol: A Sequential Playbook for Visual Impact
When you’re staring down a sea of honey oak and brass, the biggest mistake isn’t inaction—it’s acting without a plan. Random updates can leave you with a disjointed look and wasted money. That’s why we use a protocol: a specific, ordered sequence designed for cumulative, high-impact results. Think of it as building visual momentum, where each step makes the next one easier and more effective.
This order matters because it lets you define the kitchen’s new style with smaller, affordable changes first. You’ll build confidence as you go, and you’ll avoid costly missteps, like choosing a backsplash that clashes with hardware you haven’t picked yet. Here’s the filter to follow for your priority kitchen renovation updates:
- Phase 1: The “Jewelry” (Lighting & Hardware) – If you only do one thing, start here.
- Phase 2: The Workhorse (Sink & Faucet) – If you can do two, add this.
- Phase 3: The Canvas (Backsplash & Paint) – This solidifies your new color story.
- Phase 4: The Foundation (Countertops, Appliances) – Major investments to plan for last.
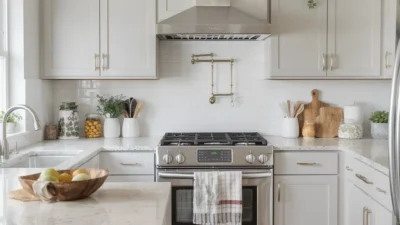
Phase 1: Update the ‘Jewelry’ (Lighting & Hardware)
This is your starting point for the most impactful kitchen upgrade you can make in a weekend. Lighting fixtures and cabinet hardware are the kitchen’s jewelry—they don’t take up much space, but they define the entire style and catch the eye immediately. Swapping these out is a quintessential set of quick kitchen refresh ideas that requires minimal tools but delivers maximum transformation.

Photo by Andrey Matveev on Pexels
Lighting: Change the Atmosphere
Outdated fluorescent boxes or ornate chandeliers cast a dated glow. Replace them with simple, clean-lined pendants over an island or a modern flush-mount ceiling light. This instantly updates the quality of light in the room, making everything look fresher. Opt for LED-integrated fixtures for a crisp, bright light that makes colors pop.
Hardware: The Style Anchor
Brass knobs and pulls from the ’90s are visual anchors to the past. Replacing them is a simple DIY project. For a modern baseline that works with almost any cabinet color, choose matte black or brushed nickel. A good rule of thumb: if your cabinets are dark, avoid oil-rubbed bronze as it can get lost; go for a contrasting finish like brushed brass or chrome to make the hardware stand out.
Phase 2: Modernize the Sink & Faucet
Once your new “jewelry” is in place, turn to the sink and faucet. This duo handles a huge visual weight in your kitchen’s landscape. A stained, shallow double-bowl sink and a low, dated faucet scream “old kitchen” louder than almost anything else. Upgrading them is a powerful kitchen facelift starting point that blends visual appeal with daily function.
A single-bowl, undermount stainless steel or composite sink immediately feels more spacious and luxurious. Pair it with a high-arc, pull-down faucet in a finish that complements your new hardware. This combination isn’t just for looks; it makes prep and cleanup dramatically easier. Brands like Moen and Delta offer reliable options with various spray functions. This change, often manageable as a DIY project with the right tools, makes the kitchen feel professionally updated every time you use it.
Phase 3: Refresh Surfaces (Backsplash & Paint)
With your new fixtures and faucet setting a modern tone, you’re ready to tackle the larger surfaces. This is where you execute the full visual transformation for an old kitchen. The backsplash and wall paint work together to redefine the room’s color, texture, and light.
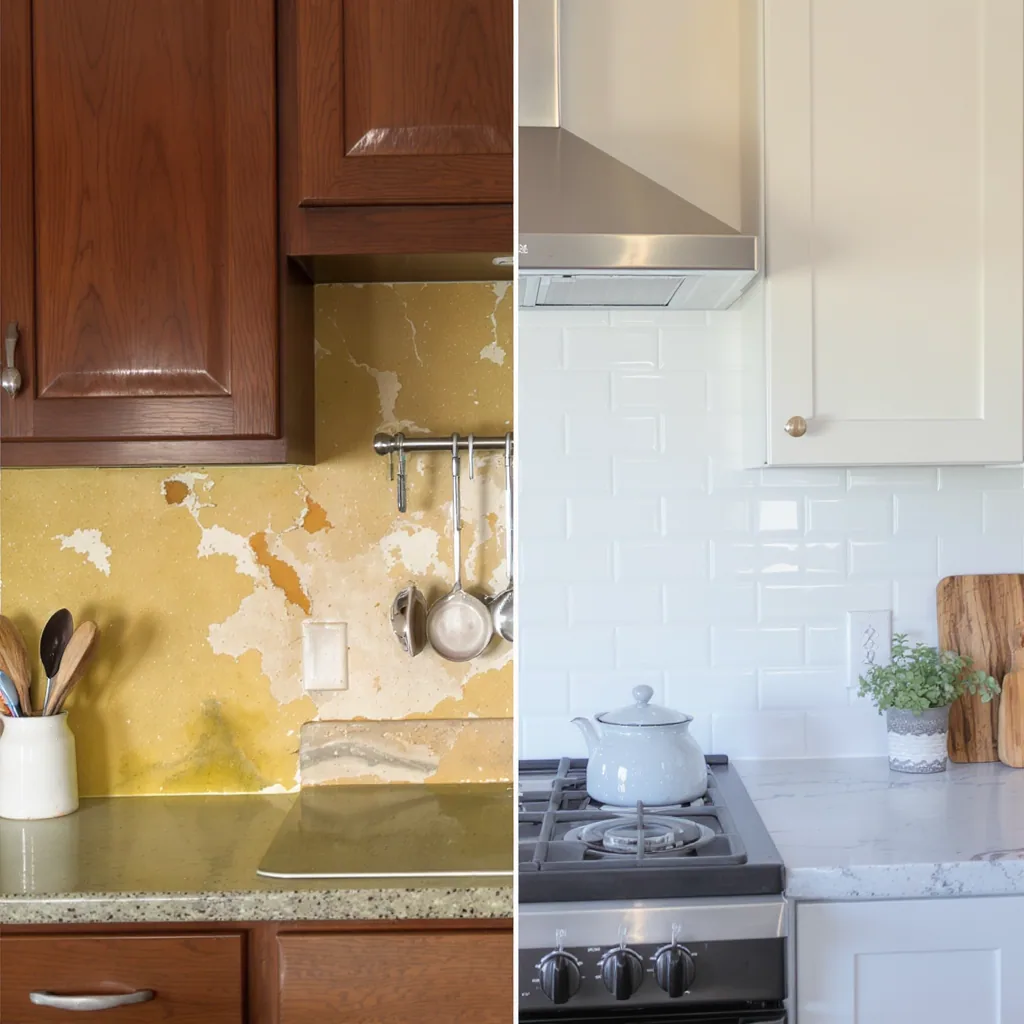
A fresh coat of paint is the most cost-effective major change. For dated kitchens, light, neutral walls (like a warm white or soft gray) can work wonders to brighten the space and make it feel larger. Use a satin or semi-gloss sheen for easy cleaning. If your cabinets are also dated but you’re not ready to paint or replace them, painting the walls a cohesive color can help them recede visually.
Next, install a new backsplash. Classic white subway tile laid in a modern pattern (like a stacked bond or herringbone) is a timeless choice that instantly cleans up the space. For more texture, consider zellige-style tiles or a simple, large-format matte tile. This layer adds personality and protects your walls, completing the refreshed look that started with your smaller updates.
What to Consider Next (If Budget Allows)
By completing Phases 1 through 3, your kitchen will already have undergone its biggest visual change. The dated feel will be largely gone, replaced by a cohesive, modern style. Now you can strategically plan for the larger investments without the pressure of living in a fully outdated space.
Countertops like quartz or solid surface offer durability and a seamless look. New appliances in stainless steel or integrated panels can streamline the aesthetic. Finally, updating flooring (to luxury vinyl plank or tile) can be the final unifying layer. The key insight here is that these major projects become easier to budget for and design around once the visual foundation from your initial, high-impact updates is firmly in place.
Build Momentum, One Update at a Time
The path from dated to refreshed isn’t about a single, overwhelming leap. It’s about following a smart sequence that builds confidence and impact with each step. You now have a clear protocol: start with the jewelry, upgrade the workhorse, then refresh the canvas.
Your very next step? Don’t try to do it all. Build immediate momentum by picking just one item from Phase 1. Maybe it’s measuring your cabinet doors for new pulls or ordering a single modern pendant light tonight. This small action breaks the inertia and proves the transformation is within your reach. Layer by layer, you’ll watch your kitchen shed its dated skin and become a space you love to use.