Your kitchen feels stuck in another decade, but the thought of a full-scale renovation is enough to make your budget—and your sanity—recoil. This frustration is a common design problem, but the solution isn’t a complete gut job. It’s a strategic, layered update. Think of your kitchen not as a single, monolithic entity, but as a composition of three distinct planes: the foundational cabinet surfaces, the defining hardware, and the functional art of fixtures. A targeted kitchen cabinet hardware fixture refresh tackles these layers in concert, transforming the room’s entire character through coordinated, high-impact changes. It’s the design science of maximum visual return for minimal structural upheaval, turning a dated space into one that feels intentionally curated and effortlessly current.
A successful kitchen refresh centers on coordinating three key layers. First, update your cabinet surfaces through paint, stain, or refacing to establish your color palette and texture. Second, swap out hardware—knobs and pulls—to inject style and improve ergonomics. Finally, upgrade key fixtures like faucets and lighting to define the room’s utility and set the mood. This layered approach delivers maximum visual impact without the cost and chaos of a full renovation.
The Science of Kitchen Layers: Why This Trio Works
Think of your kitchen not as a single room, but as a composition of visual layers. This is the core design principle that makes a targeted update so powerful. Your cabinet surfaces form the background plane—the largest area of color and texture that sets the overall mood. The hardware (knobs and pulls) acts as the mid-ground detail, providing rhythm, style, and a tactile connection. Finally, key fixtures like the faucet and pendant lights are the foreground focal points—functional art that draws the eye and defines utility.
By strategically updating these three layers, you manipulate perception. Lighter cabinet colors can make a space feel larger and brighter, while new hardware adds visual weight and guides movement. A statement faucet or sculptural light fixture creates an intentional focal point, pulling everything together. This layered approach is why a kitchen cabinet update that includes hardware and lighting feels complete, whereas just painting cabinets might leave the room feeling unfinished. It’s a science of editing visual information.
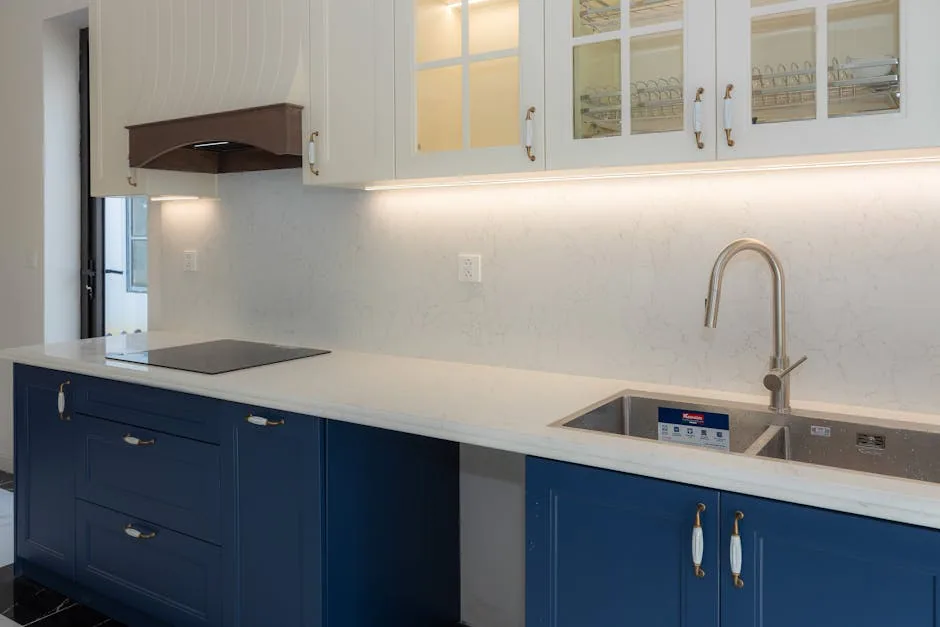
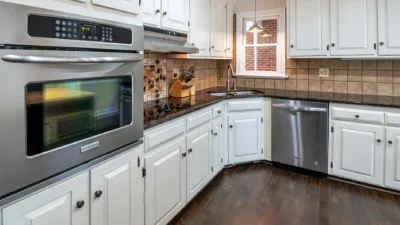
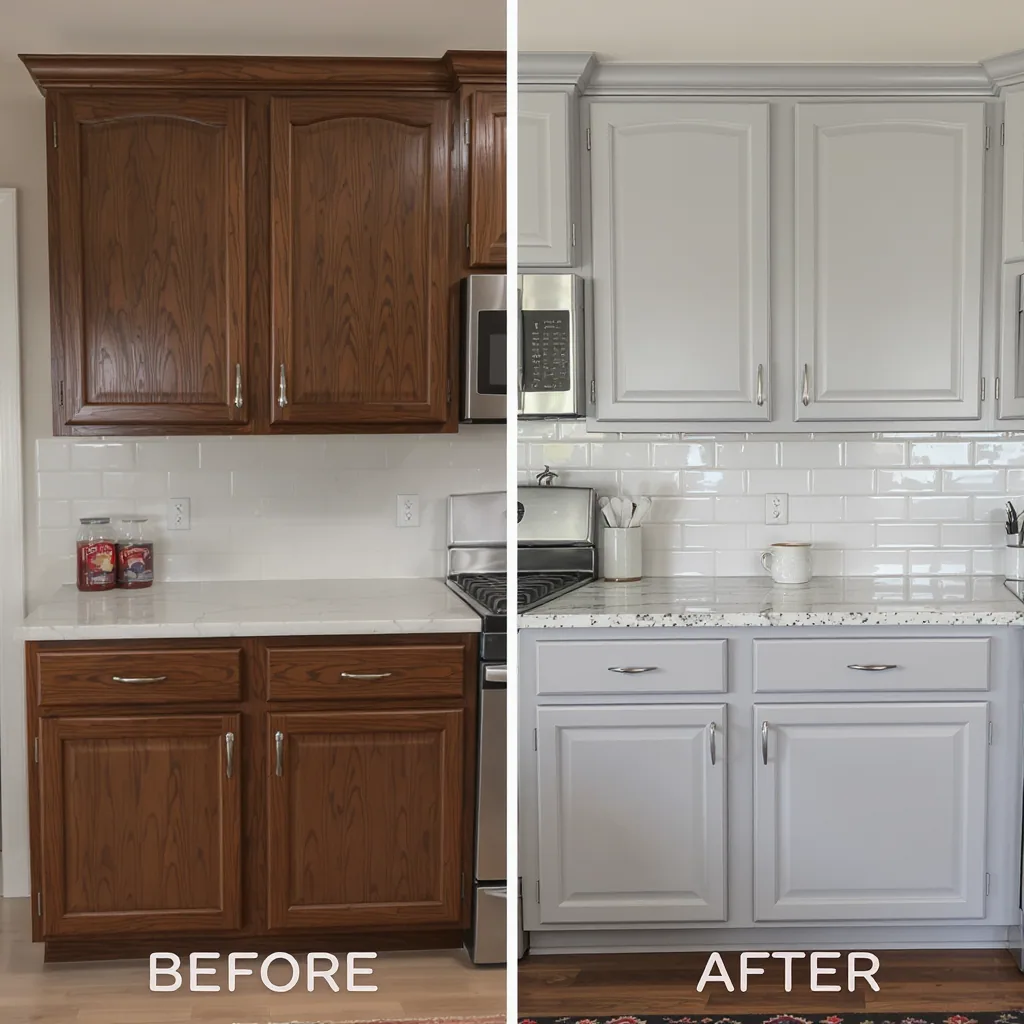
Photo by HONG SON on Pexels
The Tactile Dimension
Beyond sight, this refresh engages touch. The cool, solid feel of a new pull, the smooth operation of a soft-close hinge, and the satisfying heft of a well-made faucet lever transform daily interactions from mundane to intentional. This multi-sensory upgrade is what turns a visual makeover into a lived-in improvement.
Scenario: Mapping Your Refresh Path (Budget & Scope)
Your starting point dictates your strategy. Let’s map three common paths to help you allocate effort and investment wisely for your refresh kitchen cabinets project.
The Rental-Friendly Refresh
Focus: Maximum visual impact with minimal permanent alteration. Path: Start with kitchen fixture decor updates like a new faucet and plug-in pendant lights (with landlord approval). Then, update cabinet hardware using existing hole spacing. For cabinets, use removable adhesive films or contact paper for a color change, or simply deep clean and refresh the existing finish. This path prioritizes elements you can take with you.
The Mid-Budget Makeover
Focus: Transforming the core aesthetic with DIY effort. Path: This is the sweet spot for a full cabinet hardware refresh and painting or staining cabinet boxes. Invest time in proper prep—sanding, priming, and using durable enamel paint. Pair this with new hardware and a single, high-impact fixture upgrade, like a new faucet or an island light. The bulk of the budget goes towards quality materials for the cabinets.
The High-Impact Investment
Focus: A comprehensive, polished transformation. Path: Consider professional cabinet refacing or installing new cabinet doors for a completely new style. This allows for changing door profiles. Then, select premium hardware and a full suite of coordinated fixtures, including layered lighting (ambient, task, accent) and a professional-grade faucet. Here, the investment is in craftsmanship and cohesive, high-end materials across all three layers.
Pro Tip: No matter your budget, if you must choose one element to splurge on, make it the faucet. It’s a high-touch item used dozens of times a day, and its finish and function offer immediate daily satisfaction.
Cabinet Surfaces: The Foundation of Your Palette
This is the most labor-intensive but transformative layer. Your approach depends on your cabinet material, condition, and desired look. Here are the primary methods for executing kitchen cabinet refresh ideas.
Painting: The Color Transformer
Painting offers the most dramatic color shift. Success is 90% preparation: remove doors/drawers, clean with a degreaser, sand to create a “tooth” for adhesion, and use a high-quality primer. For kitchens, choose a hard, wipeable finish like an acrylic-enamel or cabinet-specific paint. Consider sheen: satin or semi-gloss is practical for cleaning. Color psychology matters—deep blues or greens add drama, while whites and light grays promote an airy feel.
Staining & Restoring: Honoring Wood
If you have solid wood cabinets in good shape, staining can refresh their look without hiding the grain. You can go darker, lighter, or change the tone (e.g., from orangey oak to a cooler walnut). This requires stripping old finish, sanding, and applying new stain and protective topcoat. It’s a precise process but celebrates natural material.
Refacing & Films: The Surface Swap
Refacing replaces just the cabinet doors and drawer fronts and applies a matching veneer to the cabinet boxes. It’s more expensive than painting but less than all-new cabinets, and it allows for a change in door style. For a lower-commitment option, high-quality decorative vinyl films can mimic wood grain or solid colors and are removable, making them a great kitchen cabinet update for renters or the commitment-averse.
Always test your chosen color or stain on an inconspicuous area or a spare door, and observe it under your kitchen’s lighting at different times of day before committing fully.
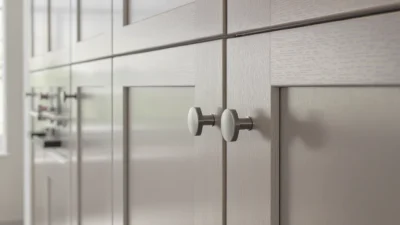
Hardware: The Jewelry of Your Kitchen
Hardware is the accessory that defines style. Swapping it is a relatively easy project with immediate payoff, making it a cornerstone of any cabinet hardware refresh. Your choices communicate whether your kitchen is modern, traditional, or rustic.
Ergonomics and Scale
Function first. Pull length should be proportional to drawer width. A good rule is for a pull to be about one-third to one-half the width of the drawer front. For large pantry or wide drawers, consider using two pulls or a long, single bar pull. Knobs are typically used on doors and small drawers. Feel them in your hand—the comfort of the grip is crucial.
Finish Selection and Mixing Metals
Finish affects both style and maintenance. Polished chrome is bright and reflective; brushed nickel is softer and hides fingerprints well; matte black is bold and modern; brass adds warmth. It’s perfectly acceptable to mix metals, but follow a rule: choose one dominant finish (used on 70% of hardware and key fixtures), one secondary finish, and perhaps a third as a minimal accent. This creates intentional eclecticism, not chaos.
Installation Precision
Consistent placement is key to a professional look. The standard is to center knobs on cabinet doors and place pulls horizontally centered on drawers. For upper cabinet doors, place the knob or pull in the lower corner opposite the hinges. To ensure perfect consistency across all doors and drawers, create a simple cardboard template that marks the drilling spots. Always measure from the edge of the door, not the center, as door sizes can vary slightly.
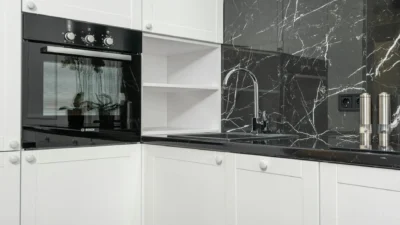
Fixtures: Defining Function and Atmosphere
Fixtures are the functional jewelry of your kitchen. Upgrading them is a direct kitchen fixture decor update that improves both utility and ambiance. Focus on the two most impactful categories: faucets and lighting.
The Faucet: Your Kitchen’s Workhorse
A new faucet modernizes the sink area instantly. Consider finish (coordinating with your dominant hardware metal), spray technology (pull-down sprayers are versatile), and mounting style (deck-mounted vs. wall-mounted). Look for features like a magnetic docking system for the spray head and ceramic disc valves for durability. A high-arc faucet improves functionality for filling large pots, while a sleek, low-profile design suits a minimalist aesthetic. Finishes like Physical Vapor Deposition (PVD) are exceptionally durable and resistant to tarnishing.
Lighting: Layering for Life
Good kitchen lighting requires layers. Ambient lighting (often from recessed cans) provides overall illumination. Task lighting (under-cabinet LEDs) is essential for food prep safety and clarity. Accent lighting (pendants over an island) adds style and defines zones. When choosing pendant lights, scale is critical: the combined width of your fixtures should be about two-thirds to three-quarters the length of your island, and they should hang 30-36 inches above the countertop. Always install dimmer switches to control mood and intensity.
Safety Note: While many faucet swaps are DIY-friendly if you’re comfortable shutting off water lines, significant lighting changes, especially involving new wiring or circuits, often require a licensed electrician.
The Coordination Playbook: Bringing It All Together
Now, the art of synthesis. A successful kitchen hardware makeover feels cohesive because all elements are chosen in relationship to one another. Avoid piecemeal decisions.
Start by creating a simple digital or physical mood board. Collect images of your inspiration kitchens, and add swatches of your cabinet color, hardware finish samples, and fixture photos. Apply a simplified version of the 60-30-10 color rule: 60% dominant color (cabinets/walls), 30% secondary color (countertops/backsplash), 10% accent (hardware/fixtures/decor).
Repeat finishes for harmony. If you choose brushed nickel for your faucet, use it for your cabinet pulls and perhaps your appliance handles. Introduce a second metal, like brass, in smaller doses—on a light fixture or as cabinet knobs on an island for contrast. Your hardware style should converse with your fixture style; clean, linear pulls pair well with a geometric faucet and modern pendants.

The Final Check: Before purchasing everything, gather all physical samples—paint swatch, hardware piece, stone or laminate chip—and look at them together in your kitchen’s light. Do they create a unified story, or is one element fighting the others? The goal is a balanced composition where no single piece shouts for attention unless you want it to.
Common Refresh Mistakes and How to Sidestep Them
Even with the best plans, pitfalls await. Here are common missteps in a kitchen cabinet hardware fixture project and how to avoid them.
Ignoring Scale and Proportion
Mistake: Using tiny knobs on large, heavy drawers or hanging a single, small pendant light over a long island. Pro Tip: Always mock up sizes. Tape paper cutouts to drawers to visualize pull length. Use balloons or cardboard cutouts hung from the ceiling to test light fixture scale before drilling.
Forgetting Existing Constraints
Mistake: Falling in love with a faucet that requires three holes when your sink has one, or choosing hardware that doesn’t align with existing drill holes. Pro Tip: Measure your sink’s hole configuration and cabinet hole spacing before shopping. While filler plates or drilling new holes are options, they add complexity.
Chasing Trends Over Timelessness
Mistake: Choosing a ultra-trendy finish or color that may feel dated in a few years, especially on expensive, hard-to-change items like cabinet paint. Pro Tip: Use trendy colors on easily swapped accessories like towels or small appliances. Invest in classic, well-made styles for permanent fixtures and neutral bases for large surfaces.
Skipping the Prep Work
Mistake: Painting cabinets without proper cleaning, sanding, and priming, leading to peeling and chips within months. Pro Tip: There is no shortcut. View prep as the non-negotiable foundation of your kitchen cabinet refresh ideas. It ensures longevity.
Planning in Isolation
Mistake: Choosing cabinet paint, hardware, and a faucet at different times without considering how they interact, resulting in a disjointed look. Pro Tip: Use the coordination playbook. Make all major selections concurrently, even if you install them in phases.
Installation Insights and Final Styling
The final stretch turns plans into reality. For DIY installation, a few tactical tips ensure a smooth process and a polished final look for your cabinet and fixture decor.
Tools and Tactics
Gather essentials: a quality drill/driver, screwdrivers, tape measure, level, painter’s tape, and a stud finder for heavier fixtures. For hardware, a template (as mentioned) is invaluable. If new hardware doesn’t match old hole spacing, you can often use a backplate to cover the old holes, or you’ll need to fill the old holes with wood filler, sand smooth, and drill new ones—a more advanced step.
When to Call a Pro
Know your limits. If lighting changes involve new wiring, a licensed electrician is a must for safety and code compliance. Similarly, if your faucet installation reveals corroded plumbing or requires modifying countertops, a plumber can save you from a costly mistake.
The Styling Payoff
Once installed, complete the refresh with intentional styling. Organize the inside of a few cabinets with shelf liners or inserts for a “reveal” moment. Ensure under-cabinet task lighting is properly aligned. Finally, style your countertops minimally—a functional canister set, a fresh plant, a beautiful wooden cutting board. The goal is to let your refreshed layers—cabinets, hardware, fixtures—shine as the stars of your newly transformed kitchen.
Your Refreshed Kitchen Awaits
A kitchen’s feel is not controlled by a single element, but by the deliberate interplay of its foundational layers. By understanding the roles of cabinet surfaces, hardware, and fixtures, you gain the power to edit your space with precision, not guesswork. This approach transforms an overwhelming renovation into a series of manageable, high-impact decisions.
The most successful refreshes begin with momentum. Don’t feel you must tackle all three layers at once. Start with the element that bothers you most—perhaps that outdated faucet or the worn brass knobs. Choose one finish, one style direction, and let that decision guide the next. Each step builds confidence and visual coherence. Your kitchen is a system to be thoughtfully curated, not just a room to be repaired. Now, with your path mapped, the first decision is yours to make.
A strategic kitchen refresh hinges on updating three coordinated layers: the cabinet background, the hardware mid-ground, and the fixture foreground. This method delivers maximum visual impact without a full remodel. Key to success is choosing a path that fits your budget and scope—whether rental-friendly, a DIY makeover, or a comprehensive investment. Remember that preparation is non-negotiable for cabinet surfaces, scale and ergonomics are critical for hardware, and layered lighting defines atmosphere. Ultimately, the goal is cohesion: plan all elements together, repeat finishes for harmony, and balance statement pieces with quiet foundations. View your kitchen as a design system, and edit it with intention.
Q: Can I mix different metal finishes in my kitchen hardware and fixtures?
A: Absolutely. The key is to do it intentionally. Choose one dominant metal (used on about 70% of items, like cabinet pulls and faucet), a secondary finish for contrast (e.g., on light fixtures), and potentially a third as a minimal accent. This creates a curated, eclectic look rather than a random one.
Q: What’s the most cost-effective way to refresh my kitchen cabinets?
A: For a dramatic change on a budget, painting is the most cost-effective method. The investment is primarily in time and quality materials—primer, paint, and tools. Thorough cleaning, sanding, and priming are essential for a durable finish that will last for years.
Q: How do I choose the right size pulls for my cabinet drawers?
A: A good rule of thumb is for the pull length to be about one-third to one-half the width of the drawer front. For very wide drawers (over 30 inches), consider using two pulls or a single, extra-long bar pull. Always mock up the size with tape on the drawer to visualize the proportion before buying.
Q: Do I need to hire a professional to install a new kitchen faucet?
A: Many homeowners can DIY a faucet swap if they are comfortable turning off the water supply lines and using basic tools. However, if you encounter corroded connections, need to modify the countertop, or are installing a complex or wall-mounted model, hiring a plumber is a wise investment to prevent leaks and damage.
Q: Should I choose my cabinet hardware or paint color first?
A: It’s often easier to
For a deeper look, see Kitchen Decor Refresh.